The Xbox 360 S, also known as the Xbox 360 Slim, was a popular upgrade to the original Xbox 360 model. While it improved upon many hardware issues, including the infamous Red Ring of Death (RROD), it wasn’t immune to GPU failures. Over time, excessive heat, poor ventilation, or long gaming sessions can degrade the GPU. If you’re noticing graphical issues or system crashes, a GPU replacement might be your only viable option to restore full functionality.
In this comprehensive guide, we’ll explore how to replace the GPU in your Xbox 360 S, what signs indicate GPU failure, tools required, tips to avoid mistakes, and whether it’s worth doing it yourself or leaving it to a pro.
The GPU (Graphics Processing Unit) in the Xbox 360 S is the component responsible for rendering images, videos, and the overall visual interface of the console. It’s essential for:
- Running high-quality game graphics
- Ensuring smooth frame rates
- Displaying the system’s dashboard and menus
- Supporting HDMI and HD video output
When the GPU malfunctions, your Xbox 360 S may not display anything on the screen, freeze randomly, or trigger warning lights, making it unplayable.

Several factors contribute to GPU issues in Xbox 360 S consoles:
- Overheating: Poor airflow or blocked vents lead to heat buildup.
- Thermal cycling: Constant heating and cooling causes solder joints to crack.
- Dust accumulation: Dust traps heat and stresses internal components.
- Extended use: Long gaming sessions wear down internal hardware over time.
- Manufacturing defects: Some GPU batches were prone to early failure.
Before attempting a repair, you should identify whether the GPU is indeed the culprit. Here are the common symptoms of a failing GPU in the Xbox 360 S:
- Red Dot of Death (RDOD) or Red Ring: Indicates hardware failure.
- Distorted Graphics: Strange lines, artifacts, or checkerboard patterns on the screen.
- No Video Output: The console powers on, but nothing displays.
- Frequent Freezing or Crashes: Especially during graphically intense scenes.
- Loud Fan Sounds: Console may overcompensate with cooling when the GPU overheats.
If you’re seeing these signs, a GPU replacement or reflow might solve the problem.
Yes—but it’s not for beginners. Replacing the GPU requires precision electronics work, including soldering and handling delicate components. Here’s what to consider:
- Skill Level: Intermediate to expert in console or PCB repairs.
- Time Required: 3–5 hours depending on experience.
- Cost: Tools + replacement GPU may range from $50 to $150.

Here’s a list of all the tools you’ll need for a successful GPU replacement:
- T8 and T10 Torx screwdrivers
- Anti-static wrist strap
- Heat gun or professional rework station
- Precision tweezers
- Plastic prying tools
- Solder wick and flux
- Multimeter (optional for testing)
- Thermal paste (Arctic Silver or similar)
- Isopropyl alcohol (90%+)
- Microfiber cloth
- Replacement GPU chip (must match the Xbox 360 S model)
- Solder balls (if reballing is needed)
- BGA stencil (if applicable)
Do this at your own risk. Always discharge static electricity and work in a well-ventilated, dust-free environment.
- Power off and unplug your Xbox 360 S.
- Use Torx screwdrivers to remove all screws from the outer shell.
- Carefully pry open the casing. Disconnect the hard drive, Wi-Fi board, and DVD drive.
- Remove the internal shielding and cooling fan.
- Unplug cables from the motherboard and remove the heatsink carefully.
- Set the motherboard on an anti-static mat.
- Use isopropyl alcohol and a lint-free cloth to clean off old thermal paste.
- Inspect for burnt or cracked areas near the GPU.
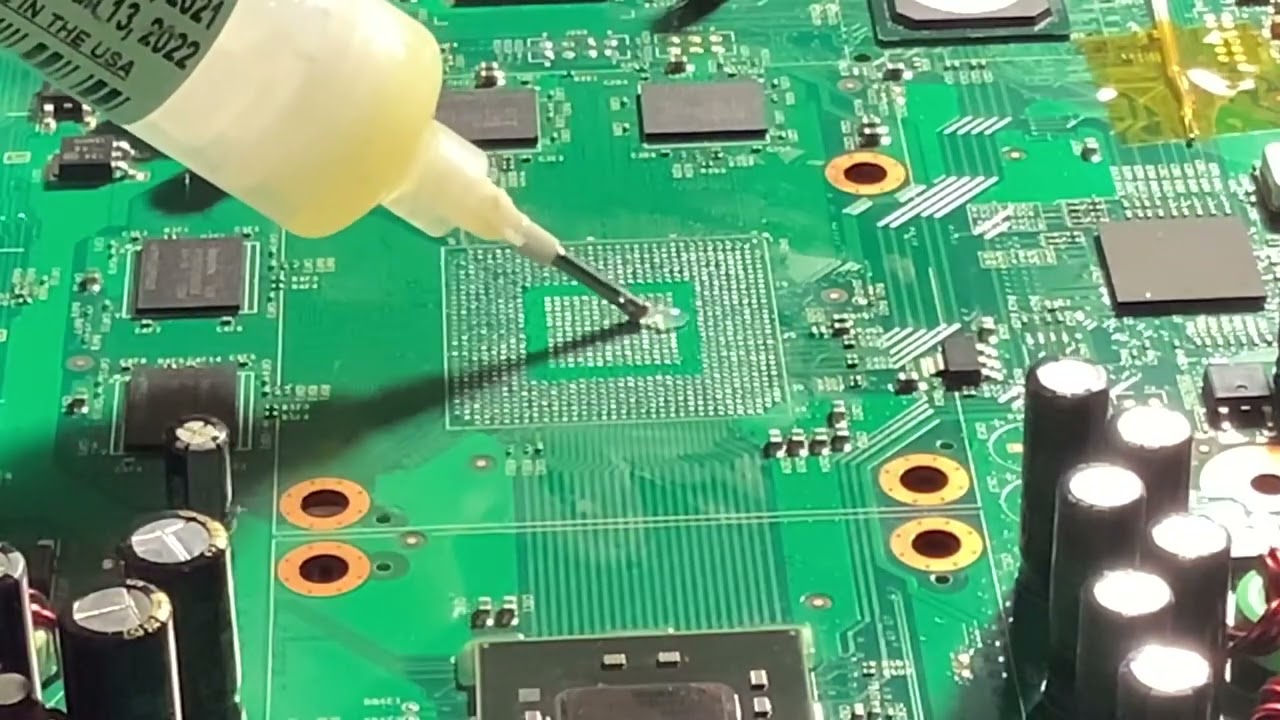
- Apply flux around the GPU edges.
- Use a heat gun or rework station to evenly heat the GPU area (approx. 220°C–240°C).
- Gently lift the GPU using tweezers once the solder softens.
- Clean the PCB pads with solder wick.
- Apply new solder balls if needed.
- Carefully align the replacement GPU chip.
- Reheat the new GPU to solder it into place.
- Allow to cool for 5–10 minutes.
- Apply a pea-sized amount of thermal paste on the GPU.
- Reattach the heatsink and fan.
- Reassemble all internal and external components.
- Power on your Xbox 360 S.
- Check for video output and normal operation.
- Run a game or a stress test to ensure stability.
- Keep the console ventilated: Avoid placing it in enclosed spaces.
- Use an external cooling fan: Optional but helpful for longevity.
- Avoid long play sessions: Give the console breaks to cool down.
In many cases, the GPU isn’t fully dead—it just needs reballing (replacing the solder balls). This process can temporarily fix a loose connection but may not last as long as a full replacement.
- Reballing = cheaper but temporary fix.
- Replacement = better long-term solution but more complex.
Here’s a quick comparison to help you decide:
| Option | Pros | Cons |
| Replace GPU | Cheaper, retains saves, eco-friendly | Time-consuming, skill needed |
| Buy Refurbished Xbox 360 S | Fast, reliable | Costs more, may not include original data |
| Upgrade to Xbox One/Series X | Modern gaming, improved hardware | Expensive, not backward compatible for all games |
If you’re attached to your game saves or love retro gaming, replacing the GPU is worth the effort.
No. The Xbox 360 S motherboard is only compatible with its stock GPU. Upgrading isn’t possible due to firmware and hardware constraints.
You can salvage one from a donor Xbox 360 S or purchase from reputable electronic part sellers or eBay.
If done correctly with quality thermal paste and proper ventilation, the replacement can last for several more years.
- Reflowing: Temporarily heats the GPU to fix loose solder joints.
- Reballing: Removes and replaces all solder balls under the chip—more reliable but requires special tools.
Microsoft no longer provides official support or repairs for Xbox 360 consoles.
The Xbox 360 S GPU replacement process is a challenging but rewarding DIY repair for gamers who want to preserve their old console. With the right tools, patience, and attention to detail, you can successfully replace the GPU and enjoy your favorite titles once again. If you’re unsure about your skills, consider professional help—either way, it’s cheaper than buying a new system.
- Gpu Making Ssd To Hot – Here’s What’s Happening and How to Fix It!
- Gpu Fast Winding Number – A Simple Guide to High-Speed Geometry Processing!
- Xbox Series X Gpu Equivalent – What PC Graphics Card Matches Its Power?